Along the Grapevine


9 Comments

Beet and Currant Salad

DSC03583.JPGWhen I read today’s Fiesta Friday post, one recipe featured from last week particularly caught my eye and I decided to make it right away. Unwilling to go shopping I had to make do with either what I had in my own kitchen or garden, and by the time I finished I had used in my version, still recognizable as Monika’s,  a few ‘new’ ingredients I thought worth sharing.

The recipe I refer to is one for Pomegranate Beet Salsa by Monika at Everyday Healthy Recipes.  It is the perfect dish for these hot dry days- simple to prepare, keeps well, and as good on its own as it is a side dish. Thank you Monika!

The so-called new ingredients in my recipe are red currants (ribes rubrum) and Queen Anne’s lace (daucus carota) leaves. The currants I have used before to make salad dressing and mayonnaise, but I had never thought of putting them whole into a salad. They are found in much of North Eastern US and Eastern Canada. Once established they thrive in sunny spots, and apparently are drought resistant given that they are still thriving in our back yard desert. One source I read describes them as a brilliant red skin encasing a pulpy flesh that contains 3-12 tiny edible seeds with flavours of raspberry, cranberry, gooseberry, rhubarb and a hint of rose. That sounds about right to me. Many sources say they are delicious as long as you add lots of sugar, which explains why they are most often used to make jelly. However, used sparingly in a savoury dish such as this one, no sugar is needed.DSC03586.JPG

As for the Queen Anne’s lace, there is so much of it blooming right now, but I had not given any thought to anything other than the flowers. I know that all parts of the plant are edible and often see reference to the leaves as being good in salads, but have never seen a salad recipe that calls for them. For identification and further information on this plant, please check here.dsc03429.jpg

Again, the herbs I used are all from my garden, but this salad is versatile, and you can make your own mix of greens to add. As for the oil, I used my black walnut infused oil, and I think any nut oil would be good, or just a good quality oil as Monika suggests, such as grape seed oil.

Beet and Red Currant Salad

3 Tbsp finely chopped red onion
3 Tbsp balsamic vinegar
2 cups chopped beets, previously boiled, cooled and peeled
2 Tbsp chopped Queen Anne’s lace leaves
1 heaping Tbsp each of fresh mint and dill
2 Tbsp oil
salt and pepper to taste
3/4 cup red currants
Put the onion and vinegar in a bowl and allow to sit while preparing the other ingredients. Add everything except the currants and mix well. Gently fold in the currants. Refrigerate for at least an hour before serving for best flavour.

DSC03580.JPGLinked to: Fiesta Friday #233


14 Comments

Black Walnut Oil and Maple Walnut Scones

DSC03477Some time ago I wrote about using black walnuts, and at that time I promised some recipes, but nothing happened. I’m not sure what I did with that first batch, but as I received another gift of fresh local nuts (thank you David) I have been giving a lot of thought to how to use them. Because they are either expensive to buy or labour intensive to harvest, I was thinking of recipes where a little would go a long way. Infusions seemed a good idea because if you have trouble separating the nut from the shell and you accidentally a few bits of shell get past you, you won’t have to worry about cracking your teeth. You can read about characteristics, identification, harvesting and shelling in my first black walnut post.

This time I found shelling them much easier. I presume practice is the key, but a few gentle raps with a heavy mallet eventually weakens them to the point where they really just do fall open and the nut is relatively easy to extract. After my smashing success I have been able to use them in baking with impunity. The smaller bits I have set aside for infusions.IMG_0341

Oil infusions are a great way to extend and preserve so many flavours. I have done this with several wild ingredients, most recently balsam fir, and it proves to be a most economical way to stock your pantry with gourmet ingredients.

This oil can also be made with English walnuts, but I would use about twice as much since the milder flavour is less aromatic. It is best to use a light flavoured oil, nothing as strong as olive oil but rather sunflower, rapeseed or avocado. I used the latter.

Begin by lightly toasting 1/3 cup walnuts, then grind them. Heat 1 1/2 cups oil until it’s just hot and then turn it off. Do not bring it to a boil. Add the toasted walnuts and leave for one day. Strain off the oil through a fine filter and store in the fridge. It can be used full strength for dressings, roasting vegetables and any other way you would use a nut oil.DSC03480.JPG

Of course, after straining the oil I was left with a small amount of ground nuts in oil which I was loathe to just toss. I considered many ideas, e.g. pesto, creamed walnut soup, homemade pasta or just baking. I finally settled on scones flavoured also with maple since we are in full syrup season.

Black Walnut Maple Scones

Ingredients

3.5 cups flour

1/tsp salt

1 tsp. baking soda

2 Tbsp chopped black walnuts or twice the amount if using English walnuts

ground nuts in oil mixture (about 2-3 Tbsp) plus enough butter to measure 2/3 cup

1 cup buttermilk, kefir or yogurt

2 tsp. cream of tartar

2 Tbsp maple syrup

Method

Mix the first four ingredients together and work in the oil nut mixture until you get a crumbly texture. In a separate bowl, combine the milk or yogurt with the cream of tartar and maple syrup. Add to the flour mixture immediately and mix until well combined. Form it into a ball and roll it out to about a 9 inch (diameter) circle. Score the surface to mark serving sized pieces. Bake at 425 F for about 18 minutes.

When coolish, you can add a glaze of maple syrup mixed with enough icing sugar to make it the right consistency.

DSC03482.JPG

DSC03483

This is perhaps my favourite scone to date. The flavour of the walnuts came through well but was not too strong, and mixing the products of two of my favourite trees a total success.

Linked to: Fiesta Friday #216; Petra at Food Eat Love; Zeba at Food for the Soul


7 Comments

Balsam Fir and Mint Cocktail

DSC03470

In my most recent post on a recipe for Balsam Fir Body Scrub I suggested using this conifer in edible recipes, which I have since done with varying degrees of success. One thing that I learned is that the wonderful flavour gets lost in cooking, so it is best used as an infusion. I began by putting a few sprigs in some olive oil and leaving it for at least a couple of weeks. This has proven to be a favourite for making dressings for winter salads.

Another way to preserve the flavour of the fresh needles is to make a syrup which then can be used to flavour all sorts of things – beverages, icings, fruit salads, or simply served on pancakes or waffles.

To make the syrup, bring one cup of sugar and one cup of water to a full boil. Turn off the heat and add two tablespoons of fresh ground needles and stir. Allow to cool completely, then strain into a jar. This will keep at least six weeks in the fridge, but for longer storage, freeze it.

DSC03467

I spent several weeks in the meantime pondering how to make the most delicious cocktail ever with this syrup. Cocktails are not complicated, but pairing the flavours is a delicate matter. I decided to use gin, as the flavour of the juniper would work well with the fir. Green tea seemed like an obvious vehicle, but I decided to make mint tea from leaves I had dried from my wild garden instead.  A little lime juice and/or some spruce tip bitters rounds out the flavour nicely.

Balsam Fir Mint Cocktail on Punk Domestics

Balsam Fir and Mint Cocktail

1 part gin

3 parts strong mint tea, cooled

1 1/2 parts balsam fir syrup

a splash of fresh lime juice

a few drops of spruce tips bitters (optional)


DSC03471

I singed some sprigs for garnish, but this should only be done if the needles are very fresh or else they risk being flambeed. Otherwise this was a huge success and I have definitely raised the cocktail bar with this one.

Linked to: Fiesta Friday #208


16 Comments

Spicy Chinese Cucumber Salad

DSC03449.JPGI first wrote about prickly ash (zanthoxylum americanum) aka Szechwan pepper last year in this post and now is a good time to revisit this prolific plant and for me to give an update. As I mentioned in my previous post, the berries can be picked at any time of the year once there are leaves on the plants, while it is still green or even when the berry has fallen and only the brown husk remains. This year I started picking in August when the berries were a bright red and easy to spot. Most are still red now in mid-September, but they are beginning to fade. I found the best way to pick them was just to cut off the branches and remove the berries in the comfort of my kitchen. No worries about over harvesting these berries. They are an invasive weed and we can’t eradicate them from our property no matter what we do.DSC03451DSC03450
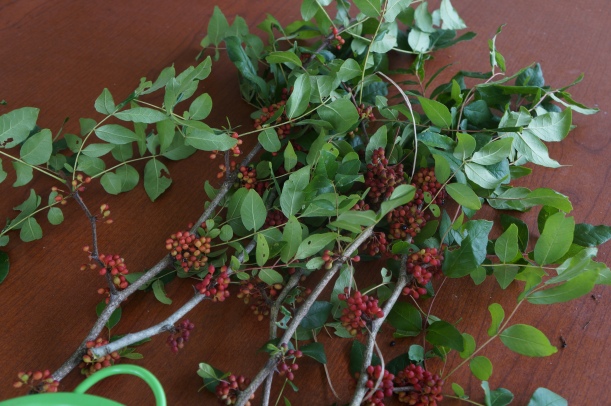
I dried them on the countertop and within a day or so the husks turned from deep red to brown and the shiny black berries were exposed.dsc03453.jpgNow they are ready to be stored and used in so many ways. So far I have made spice mixtures, added them to fermented pickles, to sauces, dressings and even to some sweet dishes. They are not hot like black pepper or chilis but have a citrussy smokey tang to them which pairs well with so many flavours.

For today I made a simple spicy cucumber dish, a popular item on Chinese menus, and one in which the flavour of the Szechewan pepper really shines. I made it rather hot and garlicky, but you can tone down those flavours by reducing the amount you use, and by removing the seeds from the pepper. I did not have chili oil on hand but infused one chopped, dried chili pepper in 2 tablespoons of oil.

Spicy Chinese Cucumber Salad

1 medium cucumber, thinly sliced

2 Tbsp chili oil

3 garlic cloves, mashed and chopped

1 tsp Szechwan pepper

2 dried red chilis

1 Tbsp rice wine vinegar

1 tsp sesame oil

1 tsp white sugar

Roast the Szechwan pepper and the chilis in a skillet until they release their aroma, but being careful not to scorch them. Mix these with the other ingredients for the dressing and pour it over the sliced cucumbers, toss and serve.

IMG_4505

Linked to Fiesta Friday #188, Jhuls at The Not so Creative Cook and Nimmi at Adorable Life.


5 Comments

Cedar Jelly

If you are one who enjoys grilled game, fish or fowl, this aromatic jelly is for you. And if you’re not one to consume any of those, you will still enjoy this with cheese and bagels, or simply on toasted sourdough bread. Either way it is a perfect condiment for any larder. 

Even knowing that cedar is one of the many flavourful and scented evergreens native to this region, I have hesitated to use it up till now. It contains a chemical called thuja which should not be consumed in large quantities, and definitely should be avoided by pregnant and nursing women. Recently I watched a cooking show about pre-colonial recipes, and noticed they used a cedar jelly as an accompaniment to game, so I figured that the quantities of thuja in this had to be tolerable. On further researching, I discovered that there are several greens which contain this chemical, most notably juniper, some mints and sage, all of which are found in most cooks’ pantries.  I also learned that early settlers used the leaves to make tea to prevent scurvy, and many campers continue to use it as an available source for a tasty drink. I therefore concluded that making a cedar jelly recipe to be consumed occasionally in small amounts would be delicious and safe, as long as you are not pregnant or nursing.

The cedar tree I am referring to is one that is commonly found in the north eastern parts of North America – the eastern white cedar. There is a similar western version, but I am only familiar with the one from this zone. It is a fast growing, hardy conifer favoured in landscaping but also easy to find in the wild. Its small scaly leaves cover the fan-shaped twigs and vary from yellowish to deep green. Its small cones grow in clumps of five or six pairs.

DSC03419.JPGThree things to note about cooking with these leaves are:

keep the simmering or steeping mixture covered to prevent the volatile oils from escaping;

use only the lighter green tips growing from sill-green branches;

the longer the cooking process, the more flavour will be lost.

So bearing these  in mind, here is the recipe I came up with.

Cedar Jelly

Ingredients

2 cups cedar leaves

2 cups water

2 cups sugar

juice of 1 lemon

1 pkg (85 ml) liquid pectin

Method

Place the leaves and water in a jar and press the leaves down to submerge. Cover with a lid and set in the sun for at least four hours. This will extract a good amount of flavour without cooking it.

Strain the liquid, add the sugar, lemon and pectin. Bring to a boil and simmer for about 10 minutes, until foam forms on the top. Skim off the foam and bottle.

To date, I have no way of measuring the ph level for purposes of canning, so I am just freezing as my method of storing. This recipe makes three 8 oz jars.

DSC03439.JPG

Linked to: Fiesta Friday #184; Food Eat Love; The Not So Creative Cook.


9 Comments

Wild Flower Cordial

DSC03429Queen Anne’s Lace (daucus carota), also known as wild carrot, bird’s nest and bishop’s lace is a white flowering plant in the familily Apiaceae. Its feathery leaves are similar to those of hemlock, fool’s parsley and water hemlock, all poisonous cousins, so it is important to identify this plant correctly. At this time of year when they are in full bloom it is easy to spot with its flat-topped white umbel, sometimes with a solitary purple flower in the centre.

Leaves, roots and flowers have all been used in cooking, sometimes as a sweetener as the plant is high in sugar. As this is my first time with this plant, I decided to use just the flowers, and to make something simple and versatile, so a floral cordial it was.

Somehow I got sidetracked by the pink milkweed blossoms from which for the first time I noticed a strong fragrant scent. And while I was at it, I added lavender to my collection. This recipe could be made solely with the Queen Anne’s Lace, but by using a mixture of flowers, I hope to convey the message that any edible, seasonal flower can be used the same way, either alone or mixed with others.

dsc03425.jpg

I counted out 3 dozen flower heads including only 1 sprig of lavender. I heated 4 cups of water, turned off the heat and set the flowers in the water until the water cooled. I then strained the liquid and added to that 1 1/2 cups organic white sugar and the juice of one lemon. I brought it back to a full boil and simmered for a couple of minutes.

The milkweed gave it a rich pink colour. I presume that all the blossoms contributed to its delicious flavour.DSC03432

The photo above shows its colour in full strength, but I recommend diluting it with 2 – 3 parts water or soda water with one part cordial. Or if you are wanting something a little fancier,  dilute it 1:1 with vodka for a pretty summery cocktail.

Wild Flower Cordial on Punk Domestics

dsc03443-e1501854487122.jpg Linked to: Fiesta Friday #183; Caramel Tinted Life and Sarah’s Little Kitchen.


10 Comments

Milkweed Pakoras

Here’s a simple recipe using wild milkweed blossoms and/or pods and transforming them into an exotic snack. A simple chickpea flour batter and a little oil for frying is all you need. If you don’t have access to milkweed, this recipe can be used for any edible wild leaves, shoots or flower buds.

DSC00932

I’ve noticed a good amount of traffic at this time of year to all posts milkweed related, which means there are those who are foraging for these plants and interested in learning new ways to use them. If you are new to this, please refer to this post here  and here for identification and precautions. Remember that they are an important food source for pollinators, especially monarch butterflies, so avoid excessive harvesting.

I currently have plants at every stage of growth which is why I was able to pick both blossoms (unopened and green) and pods (around 1 inch in length). The pods need to be immersed in boiling water for at least three minutes, and to be on the safe side I left them for five, drained them and ran cold water over them immediately.

DSC00988

DSC00873

I made a simple chickpea flour batter, salt and chili powder (optional) to taste and enough water to make a batter. Less water will give a doughier batter – I opted for a thin batter in order not to mask the shape and colour of the blossoms.  Coat the flowers and pods with the batter, fry a few at a time in hot oil until crisp and golden. Remove and allow to drain on paper towels for a few minutes. 

DSC03422

Serve with a dipping sauce of your choice. I prepared a mixture of tamarind, chili, jaggery and other spices for a piquant Indian flavour.

Related posts: Cooking with Milkweed Pods;  Milkweed Flower and Lambsquarters Soup; Milkweed Flowers; Milkweed Bud Fetuccine; Stuffed Milkweed Pods; Spicy Roasted Milkweed Pods

Linked to: Fiesta Friday #182;  Spades, Spatulas and Spoons and Jenny is Baking.


6 Comments

Stuffed Fermented Grape Leaves

DSC03414.JPG

It’s that time of they year again when the grape leaves, be they wild or cultivated, are ready to be harvested. Last year I described the method for fermenting them and at the same time proposed stuffing them with something. I finally got around to doing it, and while it’s not a hard and fast recipe as such in that you can alter it to your taste, it is a very easy and delicious way to use the fermented leaves. Easier than dolmas to make as there is no stacking or prolonged cooking period, they are just as tasty and make a perfect appetizer or picnic dish.

Before I divulge my ‘recipe’, I must point out what I learned from fermenting the leaves. Not only are they arguably the easiest thing to ferment, they have many uses in salads, dips, sandwiches and whatever. What surprised me was that they lasted the entire year without any scary changes, the texture of the leaves and colour of the liquid did not suffer over the winter. I did not even refrigerate them – just stored them in a cool place in the basement. Knowing that, I feel it is worth fermenting an even larger batch this year, which  means I need to have even more ways to use them.

For the stuffing, I used cooked sticky rice as a base. The only thing to note here is that your rice will be much better if you soak it in water for a couple of hours before cooking it. To the rice I added a little lemon juice, salt to taste, sauteed garlic and mushrooms (I used morels). Chopped roasted nuts, seeds, dried fruit or a combination of any of these would also work very well.

DSC03410.JPG

Roll the rice mixture in the leaves, vein side up, cover and refrigerate for up to one week in the fridge. I covered them with some loose fermented leaves which work as well as any plastic or aluminum wrap.

DSC03413.JPG

Linked to Angie@Fiesta Friday, Ai@Ai Made It For You and Jhuls@The Not So Creative Cook.

Related Posts: Wild Grape Leaves, Fermented Wild Grape Leaves, Grape Leaves with Roasted Vegetables, Pickerel in Grape Leaves with Mushroom Za’atar Sauce, Grape Leaf and Yogurt Pie and Quiche in Wild Grape Leaf Shells.


7 Comments

Eccles Cakes with a Difference

As a follow up to my last post on spruce tips bitters, I wanted to make a recipe to show how they can be used to flavour some baked goods. The first idea that came to mind is eccles cakes, and although not particularly seasonal, I think a good eccles cake has its own place any time of year. For anyone not familiar with these, eccles cakes are a cross between a tart and a biscuit. I have been using a very easy and reliable recipe from Davinia at Married with Cauldron, making some changes in the fruit and alcohol I use. While she calls for mixed berries, I have used a mixture of raisins and candied highbush cranberries. Instead of Jaegermeister, I’ve used spruce bitters. Feel free to use whatever combination of dried fruits you fancy!

What I like about this recipe is that it seems to work every time, no matter what variations I make. Since I discovered that spruce and dried or preserved fruits are a perfect combination, I have favoured my spruce infused vodka, but I believe these bitters work even better. The spruce flavour is subtle once mixed with the fruit and baked in these flaky shells, but the overall effect is complex and surprisingly delicious.

Eccles Cakes

For the pastry

225 grams plain flour

175 grams butter or lard

1/2 tsp. salt

120 ml cold water

For the filling

50 grams butter

100 grams soft brown sugar

250 grams dried fruit

5o ml spruce tip bitters

1 egg white, slightly beaten

1 tbsp granulated sugar

Prepare the pastry. Cover and let it rest refrigerated for at least half an hour.

Heat the first four ingredients for the filling in a saucepan until the sugar has dissolved and the fruit expands and softens. Allow the mixture to cool before assembling.

Roll out the pastry and cut into circles, about  2 or 3 inches in diameter. I made the smaller ones, which gave me 3 dozen cakes. Place some filling in the centre, moisten the edges with water and draw them up to seal. Flip them over and flatten slightly into a circle. Perforate the pastry either with a fork or by making three small slits in them. Brush with the beaten egg white and sprinkle with a little sugar. Refrigerate for 20 minutes. Bake at 350 degrees F for about 20-25 minutes until golden and crisp.

Thank you to Davinia for teaching me how to make the best eccles cakes, and so many other things on her beautiful blog. Thank you also to Angie, our gracious Fiesta Friday host and her co-hosts Suzanne at A Pug in the Kitchen and Monika at Everyday Healthy Recipes.


25 Comments

Rhubarb Chutney

I have been making rhubarb chutney as long as I have been cooking. It is more than an condiment for Indian dishes – it can be added to sauces, meatloaves, dressings, dips and sandwiches. It is simple and quick to make, and takes care of all that surplus, if that is a problem, in a way that will preserve it for the months to come. I have not made it the same twice – the choice of spices is endless and it is worth trying different combinations. Starting with rhubarb, sugar and vinegar, just add whichever spices you fancy. Make it as spicy or sweet as you wish, and just follow your nose (the olfactory part that is).

The problem with my rhubarb is that it is not of the ‘pretty’ variety. The middle is green, and although it tastes as good as any, it makes the chutney brown. In this recipe, I attempted to make an appealing red colour, so I offer a few tips to achieve this, as well as a method to prevent overcooking the rhubarb which I think also detracts from its appearance.

In order to do this, I used forced rhubarb, a method I described in an earlier post. This is not necessary, but it did make a difference in the colour. Below is a picture of my freshly picked forced rhubarb. It really is a bit sweeter and more delicate than the grown-in-the light variety.

DSC03380.JPG

I also made a rhubarb custard pie with some of it, just to highlight the beautiful colour.

DSC03390

To reduce the cooking time of the rhubarb and prevent it from collapsing into a stringy sauce, I cooked all the other ingredients first and added the rhubarb just for the last few minutes.

I processed half the jars in boiling water for ten minutes, and this also had an effect on the colour, so if you want a really pink product, it’s best to seal in jars and store them in the freezer. I also used a red vinegar, namely one in which I infused red choke cherries, but I’m not sure this made a significant difference.

Rhubarb Chutney

Ingredients

6 cups rhubarb, chopped into 1/2 inch pieces

2 cups sugar

1 1/2 cups cider or red vinegar

1 onion

3 red chili peppers

1 tbsp fresh grated ginger

1 stick cinnamon

3 tsp minced garlic

1 tsp fennel

1 tsp salt

1 cup raisins (or other dried fruit)

Method

Mix the sugar and rhubarb and allow to stand overnight or about 12 hours. Strain the syrup from the rhubarb and mix it with all the other ingredients. Cover the mixture with a tight fitting lid, bring it to a boil and simmer for about 1 hour. Remove the cinnamon stick and add the rhubarb. Continue to cook for a further 20 minutes or until the rhubarb is just soft but not disintegrating.

Makes 1.5 litres.

DSC03387.JPGLinked to Fiesta Friday #172

Dandelion Flower Syrup on Punk Domestics

Other rhubarb recipes: Rhubarb Ice Cream;  Crabapple, Rhubarb and Ginger Jam;  Sumac and Rhubarb Soup;  Rhubarb and Berry Crisp;  Spruce Tip Panna Cotta with Rhubarb Sauce;   Wild Berry Tarts with Rhubarb Curd;  Rhubarb Crabapple Ketchup