Along the Grapevine


31 Comments

Maple Walnut Nougat


DSC02935Maple syrup season is fast approaching. In fact we have already had a few days of above zero weather where we might have tapped some trees, but we hope to hold off until March. Meanwhile, we still have some of last year’s batch which means I can offer a new, nowhere else to be found recipe for the upcoming season.

I actually started this for Christmas when I wanted to use some of our own maple syrup for our festive sweets, but fudge was out of the question – too sweet and too much work. So I attempted a delicious nougat inspired by the Spanish turron I am so fond of. I used walnuts rather than almonds since they go better with maple syrup, and other than those two ingredients, just a little sugar and egg white is all you need. I added a smidge of cream of tartar just to help stabilize the eggs. And unlike fudge, you can do all the beating with an electric mixer.

It has taken this long because my first two attempts were a disaster. The first was too soft, and ended up being scooped into little balls and baked like macaroons. Very tasty but not photo worthy. I realized I needed less egg white and a hotter syrup, but the second batch got scorched, and there was no remedy for that. The third time was a success. It is not difficult to make at all, but definitely the heat of the syrup and measurements do matter.

Maple Walnut Nougat

Ingredients

3 cups chopped walnuts, roasted

1 cup maple syrup

1/3 cup sugar

1 egg white

a pinch of cream of tartar

Method

Heat the maple syrup and sugar in a saucepan until it reaches 265 degrees F or 133 C. Do this on a low heat, and keep any eye on it so it doesn’t boil over or scorch. If you don’t have a candy thermometer, it is ready when it reaches the hard ball stage, which is when a drop in cold water forms a ball but it is firm and will hold its shape on its own.

While the syrup is heating, beat the egg white and cream of tarter until they form peaks and set aside. Once the syrup reaches the right temperature, pour it slowly into the egg white mixture continuing to beat and blend the two mixtures well. Fold in the chopped walnuts and pour into a pan or moulds. I used a pan measuring 4×14 inches. Let cool and refrigerate for at least three hours before cutting.

DSC02929

DSC02932

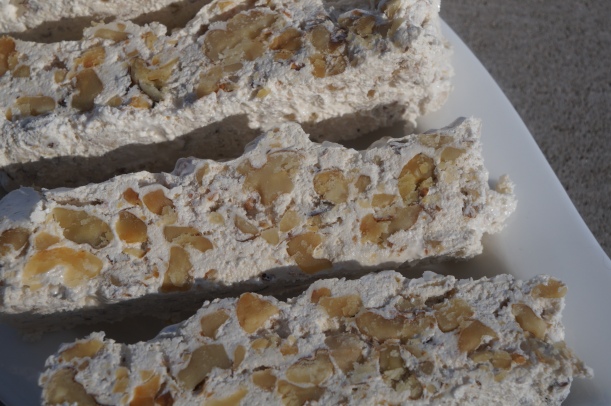
I cut some of mine a little prematurely – after about 1 hour, but if you don’t have to get pictures while the sun is shining, I recommend waiting the prescribed time and there won’t be any soft spots. It’s best to cut them just after they have set, as they can become crumbly after a day or so.

They are soft and dry – not at all hard on your teeth. The maple flavour holds up well but without being too sweet.

Linked to Angie at Fiesta Friday, Suzanne at A Pug in the Kitchen and Zeba at Food for the Soul.


22 Comments

Applejacks

DSC02909I have been wanting to make this recipe for some time now ever since I saw it on one of my favourite cooking shows on PBS, A Chef’s Life with Vivian Howard. Her recipes are very straight forward, and her attention to ingredients, always local and usually inspired by her own regional cuisine of N. Carolina is what draws me to her programme.

You can see her original recipe for applejacks, a sort of fried apple turnover, here. My original intention was to make the same recipe except instead of using dried apples, I planned to use dried crabapples. I never did locate the crabapples I was sure I had, so went for the apples after all. However, instead of using 2 cups of cider, I diluted a bit (about 1/2 cup) of crabapple preserve in the required amount of liquid. I’m sure her recipe is excellent, but I found that the preserve did add a lot of fruit flavour, to say nothing of the deep red colour. If you don’t have crabapple preserve, I feel quite confident in suggesting you just use the 2 cups of cider with 1 cup of water for the liquid as she does even though I haven’t tried that myself.

I fully intended to follow the original recipe by frying the applejacks, but I lost my nerve once I had them all assembled. I really don’t enjoy frying things, so I just brushed them liberally with butter and baked them.  The crust is very easy to make, and because it’s made with hot water it is resilient and very crisp. You can roll these out super thin, making them less rich than a regular pie crust. DSC02904

Applejacks

For the filling:

2 cups dried apple pieces

1/2 cup crabapple preserve diluted in 3 cups of water

OR 2 cups of cider and 1 cup water

1/4 cup sugar

1/2 tsp salt

zest of 1 organic lemon

juice of 1 lemon

For the pastry:

2 cups all purpose flour

1/3 cup lard

2/3 cup hot water

butter for brushing the tops

Combine everything except the lemon juice in a saucepan and simmer until the water is absorbed and the mixture is the texture of a thick applesauce. Remove from the heat and mix in the lemon juice. Set aside to cool.

Meanwhile make a well in the flour and put the lard in the centre. Begin by pouring about half the hot water into the bowl and mix it all together with your hands. Add water as needed until you are able to form a ball with it. Wrap it in a damp towel and set aside for about half an hour.

Roll the pastry very thin on a floured surface with a floured rolling pin as the dough is quite wet. Cut out circles of about 4 inches in diameter. Place about 2 Tbsp of filling just south of the middle, fold over and seal with the tines of a fork. Brush with some melted butter. Bake in a 350 degree F oven for about 25 minutes or until the pastry browns.

Makes about 24 applejacks.DSC02923

Linked to our Fiesta Friday host Angie at Fiesta Friday, co-hosts Su at Su’s Healthy Living and Margy at La Petite Casserole.


17 Comments

Mushroom Puffs

I came across this recipe from About Food for something resembling popovers made with mushrooms. It looked like the perfect base for a recipe using some of my dehydrated mushrooms and dried puffball mushroom flour. You can use any dehydrated mushrooms, and if you don’t have mushroom flour, simply omit that and increase the use of flour to 3/4 cup, as in the original recipe.DSC02888

Using the puffball flour meant I had to change the method a bit, but nothing too complicated, and the use of the flour, mushrooms and the stock made by soaking the dried mushrooms intensified the flavour.

Mushroom Puffs

1/2 cup finely chopped dried mushrooms (I used maitake)

1 3/4 cups boiling water

1/2 cup puffball mushroom flour

4 oz butter

1 tsp salt

1/2 tsp black pepper

4 eggs, beaten

1/2 cup flour

1 1/4 tsp baking powder

Soak the dried mushrooms in boiling water for ten minutes in a saucepan. Add the mushroom flour and simmer, stirring it with a whisk to incorporate the flour. Remove from the heat and add the butter, which will help cool the mixture. When it is cool enough not to cook the eggs, add the rest of the ingredients. The mixture will be the consistency of a crepe batter, and you will have about 4 cups.

Grease your pan/s liberally with oil. Place them in a preheated 400 degree F. oven until the oil starts to smoke. Pour in the batter leaving about 1/2 inch at the top.

I used a muffin tin for 6 muffins and 1 loaf pan. The ones in the muffin pan took 15 minutes to cook, the loaf 25 minutes. The batter will puff up and brown when it’s done.

DSC02891DSC02893

They don’t stay puffed for long, but unlike popovers or Yorkshire pudding, there are no big air pockets. They can be eaten hot or cold, on their own, buttered or to accompany a main dish, omelette or salad.

DSC02900

They keep well, and are delicious with just a little butter and sumac powder – for example.

DSC02895

Linked to Angie at Fiesta Friday, Steffi at Ginger and Bread and Andrea at Cooking with a Wallflower who are making this week’s Fiesta Friday possible.