Along the Grapevine


45 Comments

Nannyberry Sauce

DSC01237

DSC01239

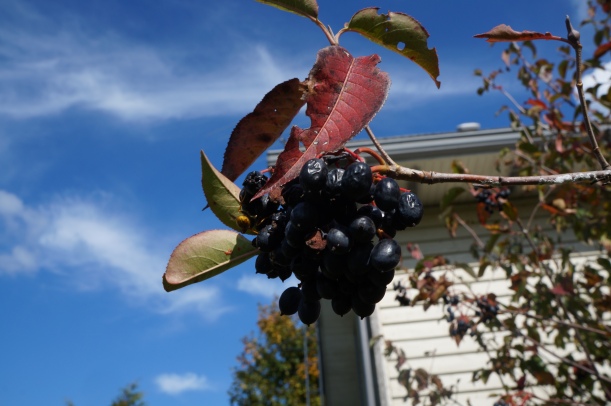
Nannyberry (viburnum lentago), also known and sheepberry and sweet viburnum, is now ripe for picking. It is not yet a fruit which is widely recognized as being edible, but its sweet juicy berries and well-worth picking. Not only are they delicious, but they are easy to identify and very easy to pick. No prickly stems, no stooping, and the thick clusters of berries can just be pulled off in bunches, making them the most economical berries in terms of time. My little harvest took no more than 10 minutes (not counting the time spent nursing my bee sting). While I can’t vouch for just how nutritious they are, the deep black blue colour of the berries make me think they just have to be good for you.

DSC01243

Nannyberries are native to the northern US and southern Canada. It is often found along roadsides, near creeks and swamps, wherever there is a combination of water and sun. It is also cultivated because of its compactness, beautiful white clusters of flowers in late spring, bright foliage in the fall, hardiness in cold climates, and of course the dark clusters of berries which ripen towards the end of September through October. One thing I discovered is that the honey bees love them, so be careful when picking and where you plant them. However, if you keep bees, or you want to attract pollinators, the plants are a great acquisition.

To help you identify it, it has oval leaves growing in pairs on opposite sides of the twigs, slightly serrated edges, and narrowing to a point. At the tip of some branches, you will see a beak shaped growth.

DSC01253

The bark varies at different stages of the tree’s life – the younger ones are smooth with spots, and later those spots turn into vertical and horizontal cracks, giving the bark a rough surface.  At this time of year, the twigs are red, and the bark of the trunk is a reddish grey. The fruit is a round blue back drupe (18-16 mm long) growing on clusters with reddish stems. They have one large, flat seed, which may be a deterrent to eating them directly off the plant. Therefore, I took the berries, cooked and strained them, making a sweet, dark sauce. The flavour is similar to that of prunes, and I think this sauce could be used in any recipe calling for pureed prunes or dates.

To prepare, cover the berries with water in a saucepan, and simmer until the berries seem very soft – about 10 min. Strain through a food mill or one of these. (Photo of straining wild grapes)

100_0441

Return the pulp to the saucepan, and add about 1/2 cup sugar per 2 cups of pulp. Heat just to dissolve the sugar.

I used this sauce on some cornmeal pancakes as my contribution to this week’s Fiesta Friday, but there are many more uses I can think of: ketchup and dips, serve over cakes, in parfaits, puddings, and ice cream.

DSC01245

Mullein Tisane on Punk Domestics


14 Comments

Stuffed Milkweed Pods

DSC01236

Milkweed pods late in the season

It is a little late in the season to be collecting milkweed pods. There are still a few small ones on the plants, and by small I mean under two inches, but for the most part they are going to seed now. When I collected pods for my first recipe, I had extra which I blanched and froze for future use. If you don’t have young plants with immature pods or some pods stowed away in your freezer, you could make this recipe just as easily with okra (which has a very similar taste), peppers or zucchinis. In any case, blanche the vegetables first. If you are collecting milkweed pods, please refer to my post on “Milking the Weeds”.

I chose to make a vegan and gluten free recipe. Using polenta, mixed with dried mushrooms and chili peppers, I found there was enough flavour as is – but if you want a richer and non-vegan recipe, add 1/2 cup of shredded hard cheese and/or sprinkle some cheese on top before baking. Use whichever herbs you prefer, fresh if possible. I used thyme, but parsley, basil, tarragon etc. would all be good. I also used powdered sumac as a garnish, but paprika would work just as well. Choose your peppers according to how hot you want it – the serrano peppers I used with seeds made it noticeably hot, but not overwhelming.

Milkweed Pods Stuffed with Polenta

  • Difficulty: Easy
  • Print

Ingredients

36 cleaned (seeds removed) and parboiled milkweed pods, between 1 and 2 inches

1 Tbsp olive oil

1 onion, chopped finely

3 cups boiling water

3 Tbsp dried mushrooms, chopped

2 dried chili peppers, chopped

1/2 cup cornmeal

1/2 tsp salt

1 Tbsp chopped fresh or 1/2 Tbsp dried fresh herbs

a light sprinkling of oil and sumac or paprika

Method

Pour boiling water over the mushrooms and chilis and set aside until the water cools.

Fry the onion in olive oil until translucent, but not browned.  Add the water, mushrooms, salt, chili, herbs and cornmeal, and cook over a medium-low heat, stirring constantly, until the mixture comes away from the sides of the pan – about five minutes.

Fill the pods while the mixture is still hot. Place them in a shallow casserole dish, and spray or drizzle with olive oil and sprinkle some sumac or paprika on top. Bake in a preheated 400 F degree for about 15 minutes, until they are heated through and beginning to brown on top.

Serve warm. Makes approximately 36 pods.

DSC01225

Stuffed pods before baking

DSC01230

Stuffed pods after baking

These make a delicious side dish, or can be served as an appetizer.


44 Comments

Anise Hyssop and Peach Ice Cream

We have already had our first light frost here in E. Ontario, and have lost some of the ‘delicates’ of our harvest. I am therefore gathering and using all the herbs I can, some of which I will preserve, but most I hope to use fresh while I can. One discovery I have made is that mixing herbs with any sort of dairy base is a great way to bring out the flavour, as it draws out the oil. Also, considering that herbs can be paired with so many fruits in salads or sweet dishes, there are so many more ways of using them than I have previously done. So with this in mind, I decided to make a herb and fruit ice cream, this time with peaches and anise hyssop, to share with Angie and guests at this week’s Fiesta Friday.

DSC01218

DSC01219

Anise hyssop, or licorice mint, is a hardy perennial of the mint family, and once you have it established, you are guaranteed a regular annual crop. Its leaves look like catnip leaves (same family) and its tall purple flowers which bloom in the late summer also resemble that plant. It is not exactly a weed, but like mint can be invasive, and therefore I include it in my list of backyard forageables. It has a deliciously sweet licorice flavour, and makes a wonderful tea, cordial, marinade or addition to many dressings and sauces. And because it does not have the bitter flavour of some herbs, you can use large amounts with impunity.

If you  already have a favourite ice cream recipe, you can incorporate it into that if you like, as long as you can infuse some of the liquid you are using before making the ice cream. I made a simple custard based recipe because I find it stores best, as the eggs prevent crystallization.

Anise Hyssop and Peach Ice Cream

  • Servings: 6
  • Print

Ingredients

1 cup milk

2 Tbsp chopped anise hyssop leaves

1 cup chopped fresh or frozen peaches

1 cup heavy (35%) cream

1/3 cup sugar

3 well beaten egg yolks

Method

Put the milk and herbs in a saucepan, heat and simmer for about 5 minutes. Allow to stand another ten minutes.

Meanwhile, coarsely chop the peaches and put them aside.

Make the custard by heating the cream, sugar, and strained herb milk mixture until it almost reaches boiling point. Gradually pour this mixture in a slow stream into the eggs, stirring while you do it. When about have the cream mixture is mixed into the eggs, return it to the pan with the rest of the cream. Continue to heat and stir until the mixture coats the back of a spoon, about five minutes. Allow to cool slightly, then add the chopped peaches. Put it in the fridge to cool, then finish in an ice cream maker according to the manufacturer’s instructions.

DSC01224

This recipe can me made with other fruits and herbs, although hard fruits like rhubarb and apple will have to be cooked first.


20 Comments

Fermented Unripe Blueberries

If you have been following this blog lately, you will have noticed that I have started to ferment many of my wild edibles from the garden. It is my new favourite method for preserving most of my harvest, and for using as a base for some interesting dishes. I mentioned that I had bought some air locks which I intended to use. My usual method is simply to pour a brine over whatever (e.g. vegetables, cucumbers, ramps) with whatever flavourings and spices I feel like using, weigh them down to keep them submerged, cover with a paper towel or cheesecloth to keep the bugs out, and that is it. Just wait a few days until the taste is right, put a lid on it and into the fridge. I have also used whey instead of the brine, but I seem to be favouring the brine method. I did promise that once I figured out the airlock, I would share it.

The one fermentation I have done with the airlock is with green blueberries instead of wild unripe grapes, which I would have used had I had any. Having shown up rather late to the blueberry picking, I found mostly green berries on the bushes, so decided I would have to figure out something to do with them. My first experiment was with my version of verjus, which has been an excellent substitute for vinegar in salad dressings. Those which remained, I fermented.

DSC01078

The airlock is the same that is used in making beer or wine, and can be purchased wherever supplies for this are sold for between $2-3. The idea is that it allows carbon dioxide to escape while not letting any air in. You will need a bung, or rubber stopper as well as the airlock. The stopper looks like a cork with a hole through it. The airlock is fitted into the hole once the outer part is filled with water up to a line, the inner part place over the middle tube. The lid has small holes in it to let the carbon dioxide escape. Here’s what it all looks like.

DSC00999

DSC01160

I filled a sterilized jar about 3/4 full with blueberries, covered it with the brine – made from 2 Tbsp salt per 1 quart of non-chlorinated water. I carved a hole in the lid in which to fit the bung, set the airlock in and left it for about 10 days – until lots of bubbles formed on top. The time will vary depending on the temperature of your kitchen, but ideally this should be not above 75 degrees F.  Then I put a regular lid on it, and put it in the fridge.

To try these probiotic-rich berries, I decided to add them to a salad made with what I had in the garden, which this week is beans and potatoes.

DSC01154

DSC01162

I blanched the beans, boiled and peeled some blue potatoes (any colour of potato will work but I wanted to stick with the blue and green theme I had going), a mustard and garlic vinaigrette, and my fermented blueberries. By mistake, I added salt to the dressing, and thought maybe with the salty berries it would be too much, but as it happens the blueberries did not taste that salty, and the seasoning was just right. DSC01168

These would be good with just about any salad, but I would like to try them with fish, and possibly in a sandwich filling. This same method can be used with most other berries, though not strawberries. I could even be done with actual blueberries! but it was a great way to use the unripe ones.


35 Comments

Burmese Semolina Cake with Wild Grape Glaze

Even though I am visiting Toronto for a few days, I am still able to attend this week’s Fiesta Friday and bring with me not only a delicious semolina cake, but also Bob the Dog, whom I am cat sitting for a few days. Bob has been with us now for 18 years when we adopted him in Singapore. Since then he has been the charge of and companion to our youngest daughter. He has lived in four different countries, 6 cities, and visited several others. He likes to travel. So here he is, well behaved as always.

DSC01183

And now for my recipe. If you have been following this blog at all lately, you will know that the wild grape harvest is really not happening in my neck of the woods. I had a lot of ideas of what to do with grapes, but most of it will have to wait for a better season. However, with the very small amount of pressed grape juice I do have so far, I wanted to use it in a way in which its flavour and beautiful colour could be appreciated. You could use any fruit concentrate or jelly for this recipe, or if you have wild grapes, simply simmer in water until they are very soft, and then pass them through a food mill. The recipe I chose to make  is based on one from Naomi Duguid’s Burma, Rivers of Flavours, which is more than just your usual cookbook. The author’s own travels, photographs and research provide a fascinating account of this little-known country.

DSC01173

There are many different versions of semolina cake and, in my opinion, they are all delicious. I have had a Sri Lankan cake with cashews, a Brazilian one with coconut, and a Greek one covered with orange syrup to name just three. Semolina is made from durum flour, usually used in making pasta, and when it is toasted, as in this recipe, it makes for a rich, nutty flavour. I followed Naomi’s recipe fairly closely with a few minor changes. I used butter instead of oil in the mixture, and omitted the butter she drizzled on top of the cake before baking. Where she grilled the cake with some almond flakes after baking, I just added some grape and honey syrup  thickened with cornstarch and sprinkled on some toasted coconut.

DSC01174

DSC01181

Burmese Semolina Cake with Wild Grape Glaze

  • Servings: 10
  • Print

Ingredients for the cake                                   Ingredients for the Glaze

1 cup semolina flour                                                1/3 cup concentrated grape juice

1 cup brown sugar                                                    1/3 cup liquid honey

1/2 tsp. salt                                                                1 Tbsp cornstarch

1 cup fresh or canned coconut milk

1 cup warm water

4 eggs, lightly beaten

1/4 cup melted butter

1/2 cup toasted coconut (optional)

Method

Heat a heavy skillet on medium heat and add the semolina. Stir it as it cooks until the colour turns noticeably from a pale yellow to a deep golden colour. Remove it from the heat and continue to stir until the pan cools down. Add the sugar and salt and transfer it to a bowl. Add the coconut milk, the warm water and eggs and mix until thoroughly combined. Let rest for about half an hour.

Melt the butter in saucepan over a medium heat and add the semolina mixture. Stir with a wooden spoon as you would making porridge, until it becomes thick and comes away from the side of the pan (about 10 to fifteen minutes). Pour it into a slightly greased pan or skillet and pat down until flat. Bake in a 350 degree oven for about half an hour, until the top feels dry and firm.

While the cake is baking, put the cornstarch in a small bowl and pour the grape juice over it and mix until well blended. Heat the grape mixture with the honey over a medium heat for about five minutes, until it is well heated through and slightly thickened. Set aside. If using the coconut, brown it in a skillet over medium heat until golden in colour.

Remove the cake  from the oven and drizzle the glaze over it. Sprinkle the toasted coconut on top.

DSC01178

DSC01180

As you can see from the pictures, this is not a light fluffy cake. It is more like a halva with a distinct flavour of semolina. It stores well to.


41 Comments

Clear Tomato Soup with Lemon Balm and Vodka

I’m not complaining, but I do have an awful lot of tomatoes to deal with this year. Every day I pick a pile like this, and then have to do something with them fast.

DSC01145

We consume what we can fresh, and the rest I dry, roast, or make into a very thick sauce to freeze. But to-day I decided to use them in a completely different way, by straining only the colourless juice out of them and making a soup. So my contribution to Fiesta Friday this week is this unusual soup – a light broth with a zingy flavour, elegant enough for a dinner party, tasty enough to drink from a tall glass.

I will be co-hosting Fiesta Friday this week, now in its 32nd week. I look forward to meeting everyone and seeing what they bring. Even if you are not participating, I recommend checking out the contributions. Just click on the link above. You are bound to be entertained and inspired. And a big thank you to Angie, our gracious hostess, for making this event the success that it is.

For my recipe, I added some greens and garlic from the garden. As I was hunting for herbs, I had to pass through my healthy patch of lemon baln (melissa officionalis), a member of the mint family. In North America it has escaped cultivation and grows wild. If you have it in your garden, you will have to whack it back regularly or it will take over completely. However, a little is nice to have for its beautiful, lemony aroma. It is considered to have some health benefits for digestive problems and has a calming effect, usually taken in the form of oil extracted from it. As for cooking, I find heat removes the very mild flavour it has, and so it is not very useful. However, as I was using this raw, I hoped it would add a little something to my soup recipe.

DSC01149

DSC01148

To make the soup, I filled the food processor with roughly chopped tomatoes (2 lbs), some chives, lemon balm, basil and a sliver of garlic. I repeated this four times. Then I strained it through a linen cloth, which took about three hours. If you are working in a cool place or have room in the fridge, it would be better to leave it overnight, but I was short of space. My eight pounds of tomatoes et al produced about 4 cups of clear juice. The strained tomatoes I then used as a salsa, so nothing was wasted. Just add a little salt and hot pepper.

DSC01150

This soup could be heated, but since it was a summery day, I left it cold. And I added 1 tablespoon of vodka per cup of soup. This is not necessary – the soup was delicious without it – but the vodka does go well with it.  A sprig of lemon balm, and it’s ready to serve.

DSC01157

The flavour of the clear tomato broth is surprisingly strong, and is a pleasant change from the usual pulpiness of the fruit. I think it might be good to make it from frozen tomatoes, where the clear juice separates so much more quickly once thawed. It would be wonderful to enjoy the flavour of fresh, uncooked tomatoes in the middle of winter.